June 24, 2010
Ode to a Pittily Little iPhone Camera That Could
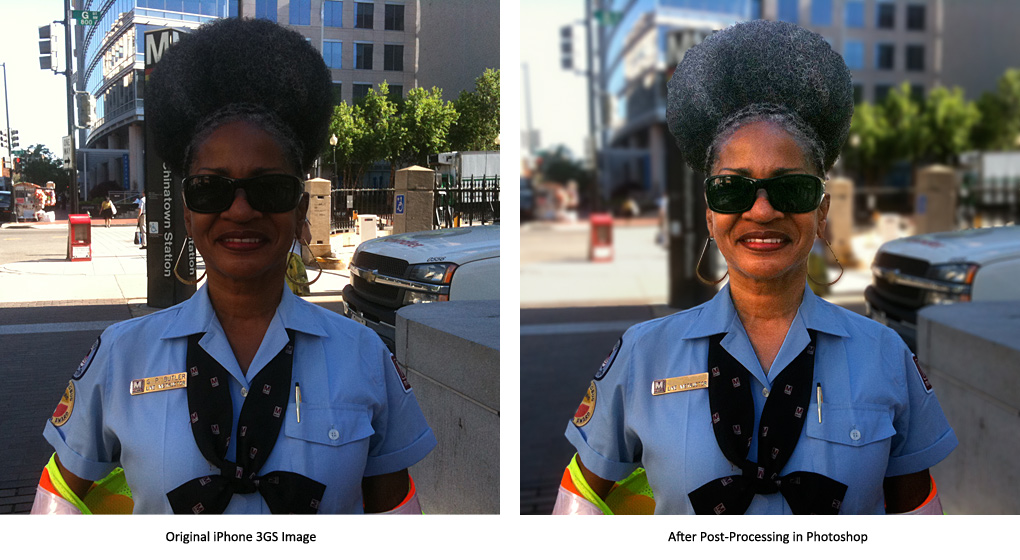
Click on image for a larger view.
I picked up my new iPhone 4 this morning. One of the main reasons bought it was for its upgraded camera. It’s been pushed from 3 megapixels to five and its sensor is now back-illuminated. In plain language that means I should get brighter images with more detail. Yes, I have my better and more professional cameras yet I never seem to have them when I need them. But I always have my iPhone. And, I’ve taken some pretty good pictures with it, despite its meager specs.
Before moving on to my new iPhone I wanted to say thank you little 3GS camera and show you how I compensated for its limitations. Above is one of the best images I ever took with the phone’s camera. It was all I had when I saw Glenda walking towards me. And I didn’t have much time to take the pic. No “would you move just a bit to the right” or “could you smile just a little—no a little less.” We were both on our way to work and had little time for this impromptu photo op. I was grateful she allowed me to take her picture. Any photographer will tell you that “decisive moment” is hard to capture. So I did the best I could. I made sure she was centered and focused. She did the rest.
When I looked at the image I’d taken I was a bit disappointed. Despite using the camera’s focusing and exposure box her face was in deep shadow. I thought this might be a problem when I took the photo because of the bright background. I was happy to see detail in her face and hopeful that I could use Photoshop to bring it out.
No matter what I take a photograph with I always bring it into Photoshop before putting it on out there for the world to see. And I love this post-production process. Control baby! That’s what it’s about: getting the best out of what I’ve got to work with. Back in my digital darkroom I started by lightening her face and hair. Amazingly, the detail came out nice and strong (not bad for just a pittily phone camera). I liked the warm skin tone and kept it. But to really make her portrait pop I decided to create a shallow depth-of-field, throwing the background out of focus. Digital cameras have a hard time with depth-of-field and it’s even more difficult to control when your camera is totally automatic. Creating depth-of-field after the fact is a multiple step process, something I’ve already outlined. In this case there was one last challenge: Glenda’s earrings. I had to make sure they stayed sharp, along with her face. I used Photoshop’s pen tool to create a very precise path around them so I could kept them in focus when I threw the background out of focus. With that done the pic was complete.
So, before moving on to the iPhone 4’s more luxurious 5 MP camera, I wanted to pay homage to my little camera that could. Thanks for the great pics!
- [ Photography, iPhone 3GS, Photoshop ]
View Most Recent Story![]() :::
:::![]() Notify me when there's a new missive!
Notify me when there's a new missive!


 ShareThis